No products in the cart.
Apple Pudding That Makes Its Own Sauce? Yes Please!
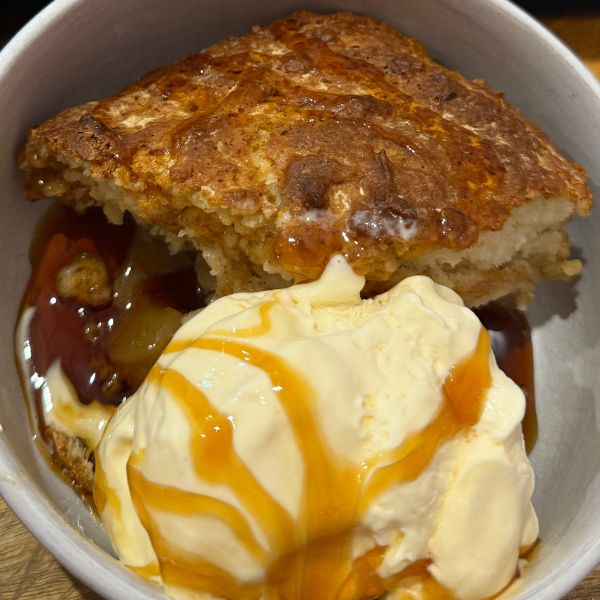
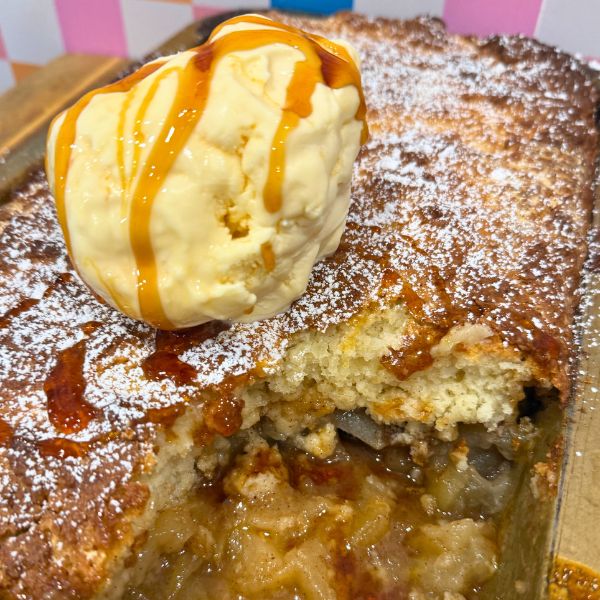
Let’s have a moment of truth: there’s dessert… and then there’s self-saucing apple pudding – that warm, golden, spongey wonder with gooey syrup hiding beneath its fluffy top. If you’ve never tried it, you’re in for a proper treat. If you have tried it, you already know it’s the ultimate comfort dessert that never misses. And this apple pudding recipe? It’s a keeper. 💯 Picture this: tender spiced apples at the bottom, a fluffy cake layer in the middle, and a sticky golden syrup sauce that forms magically in the oven. It’s ridiculously easy, relies on pantry staples (hello, canned apples 👋), and is 100% weeknight-friendly. Or Sunday roast-friendly. Or, honestly, Tuesday-night-in-your-PJs friendly.
June 6, 2025

Apple Pudding: Why You’ll Love This
Let me just say it – this apple pudding recipe is the dessert equivalent of a warm hug. Here’s why it’s going to become your new go-to:
Self-saucing magic: No extra steps or stirring needed – just pour, bake, and boom, sauce.
Minimal prep: We’re talking under 15 minutes to get it in the oven.
No peeling apples: Canned apples save the day (and your prep time).
One dish = less mess: You’ll only need a mixing bowl and a baking dish.
Crowd-pleaser: Sweet, spiced, and perfectly gooey – what’s not to love?
This isn’t just a dessert. It’s an experience. A hot, sticky, cinnamon-laced apple moment that tastes like your Nan made it.
Tips and Tricks for the BEST Self-Saucing Apple Pudding
Here’s how to make sure your apple pudding is soft, saucy, and a show-stopper every single time:
1. Trust the pour-over method:
When you pour that boiling water + golden syrup mixture on top of the batter, it’ll look like a hot mess. But don’t stir! The sauce sinks as the cake rises – baking sorcery at its finest. ✨
2. Use canned apples in juice, not syrup:
This gives you more control over sweetness. Drain well, then toss with cinnamon and cornflour to thicken the juices.
3. Yoghurt in the cake = moist sponge every time:
I use thick, full-fat Greek-style yoghurt for extra richness and perfect texture.
4. Go heavy on the cinnamon:
Apples love spice! Add a dash of nutmeg or ground ginger if you’re feeling fancy.
5. Don’t overbake it:
It should spring back on top, but still be gooey underneath. The sauce will thicken more as it cools.
The Best Ingredients for Apple Pudding
If you want your apple pudding recipe to go from good to next level, here’s what I recommend:
Canned sliced apples: Choose the ones in juice – Woolies or Coles both do great budget-friendly options.
Golden syrup: The real MVP. Don’t skip it. I use CSR or Lyle’s – rich, buttery, and iconic.
Greek yoghurt: Adds tang and keeps the sponge from drying out.
Self-raising flour: Aussie pantry staple. No need to mess with baking powder.
Free-range eggs: For best rise and flavour.
Serving Suggestions for Self-Saucing Apple Pudding
This pudding deserves some love when it comes to serving. Here are a few perfect pairings to elevate your dessert game:
Vanilla ice cream: Melts into the sauce, makes it extra indulgent
Hot thick custard: Classic combo, especially on cold nights
Double cream or dollop cream: If you’re feeling a bit bougie
Chopped roasted walnuts or pecans: For a crunchy twist
A dusting of icing sugar + fresh apple slices: Fancy presentation for guests.
And hey, this dish isn’t just for dessert. It totally holds its own at brunch with coffee. Go on, live a little.
Storage Options for Leftover Apple Pudding (If There Are Any)
This dessert rarely survives the night at my place, but if you do have leftovers:
Fridge: Store covered for up to 4 days. It stays moist and the sauce holds up!
Freezer: Freeze in individual portions for up to 2 months. Defrost overnight in the fridge.
To reheat: Microwave individual serves for 45 seconds to 1 minute. Add a splash of cream or syrup before heating if you want to revive the sauce.
Pro tip: This pudding is just as dreamy reheated the next day – maybe even better.
Other Recipes to Try If You Love Apple Pudding
Craving more warm, saucy goodness? Try one of these comfort classics next:

Fun Variations to Try with Apple Pudding
One of the reasons I love this apple pudding recipe so much is how versatile it is. You can switch it up with what you’ve got on hand or suit different flavour cravings. Here are some delicious ways to give your pudding a fresh twist without losing that self-saucing magic:
Apple & Pear Pudding
Mix one tin of sliced apples with one tin of pears for a beautifully soft, subtly sweet combo. Pears melt into the sauce and give it a silky texture – perfect for winter!
Apple & Berry Pudding
Fold in a handful of frozen blueberries or raspberries with the apples before adding the batter. The tartness from the berries cuts through the sweetness and adds a burst of colour.
Chocolate Apple Pudding
Add 2 tablespoons of cocoa powder to the cake batter and use brown sugar instead of white. It gives you a rich chocolate sponge over the apples – like a Black Forest pudding!
Apple & Oat Crumble Top
Want a bit of crunch? Before baking, sprinkle a mix of oats, brown sugar, and butter over the top of the batter (just lightly, so the sauce still forms underneath). It’s like a hybrid of a crumble and a pudding – best of both worlds!
Add some crunch
Toss in a handful of chopped walnuts, pecans, or almonds with the apples. They’ll toast as the pudding bakes and add an amazing nutty crunch.
Zesty Apple Twist
Add the zest of one lemon to the batter for a refreshing, citrusy lift that cuts through the richness of the golden syrup sauce. Great for warmer weather or when you want something a little lighter.
No matter how you mix it up, the base of this easy apple dessert stays reliable, simple, and delicious. It’s like a warm canvas for all your sweet dreams (and pantry odds and ends).
Don’t Forget to Share Your Apple Pudding!
I love seeing your kitchen creations – it’s honestly my favourite part of sharing recipes! If you make this apple pudding recipe, snap a pic and tag me on Instagram at @steph_cooks_stuff. Let’s get saucy together!
Final Thoughts: Why Apple Pudding Deserves a Spot on Your Dessert Roster
Whether you’re feeding the family, treating your mates, or just looking to warm up on a cold Aussie night, this self-saucing apple pudding brings big nostalgic energy and even bigger flavour. With its dreamy syrupy base, fluffy sponge, and comforting cinnamon-spiced apples, it’s a dessert that’ll have everyone coming back for seconds (and thirds).
And with a simple, no-fuss method and humble ingredients, it’s proof that great desserts don’t need to be complicated. All they need is a bit of golden syrup magic.

Steph de Sousa
Apple Pudding
No ratings yet
SELF-SAUCING APPLE PUDDING = MAGIC IN A DISH 🍎🍰
This pudding is like a big warm hug in dessert form! Juicy apples, soft spiced cake, and a gooey golden syrup sauce that magically appears underneath as it bakes. It’s easy, old-school, and completely irresistible – especially with a scoop of ice cream or a drizzle of custard on top!
Prevent your screen from going dark
Prep Time 30 minutes mins
Cook Time 1 hour hr
Servings: 8
Course: Recipes
Cuisine: Australian
Calories: 472
Method
- Preheat your oven to 180°C.
- Spread the canned apples in the bottom of a lasagne-style baking dish. Sprinkle over the cinnamon and cornflour and give it a little stir.
- In a bowl, whisk together the sugar, yoghurt and eggs until smooth. Add the flour and mix into a thick cake batter.
- Dollop the batter over the apples and gently spread it out – don’t worry if it’s thick!
- In a jug, mix together the cornflour and water and mix. Add golden syrup and the boiling water and stir well.
- Now for the magic! Gently pour that golden syrup mix all over the top of the batter – trust the process!
- Pop it into the oven for 45–60 minutes (mine took 55). You’ll know it’s ready when the centre springs back when gently pressed.
Nutrition
Video
Tried this recipe?
Let us know how it was!Frequently Asked Questions
Q1: Can I use fresh apples instead of canned?
Totally! Peel and slice 4–5 Granny Smiths, then cook them gently with a tablespoon of sugar and a splash of water until just tender. Use them just like the canned ones.
Q2: Can I prep this in advance?
You can prep the apple base and cake batter a few hours ahead and keep them separate. When ready to bake, just assemble and pour on the sauce.
Q3: What if I don’t have yoghurt?
Sour cream or buttermilk will work in a pinch. You want something with a bit of tang to balance the sweetness.
Share


Hi, I'm Steph!
I turned a lifelong passion for food into a career as a professional chef, stopping in the Masterchef kitchen along the way. My goal is to inspire everyone to learn to love cooking, using basic pantry ingredients and fresh local produce to create delicious dishes.